


Introduction
Setting up a video wall requires more than connecting multiple displays together. This guide explains the complete installation process, from planning to final calibration.
Many businesses invest in video walls but face problems such as poor image alignment, unstable signals, and unexpected maintenance costs because they ignore technical planning before installation.
This article helps buyers understand each installation stage, select suitable technologies, and make better decisions with insights from an LED display manufacturer’s perspective.
What Is a Video Wall and How Does It Work?
A video wall is a large-scale visual display system that combines multiple display units with controllers and software to create one unified image, video, or data visualization platform.
Unlike a standard monitor, a video wall distributes content across multiple display modules while maintaining synchronization, brightness consistency, and visual continuity.
Businesses use video walls in environments that require large and dynamic information displays, including control rooms, retail stores, conference centers, stadiums, transportation hubs, and digital signage networks.
AIO Grab Block
Conclusion Sentence:
A video wall is a professional display system that integrates multiple display units, control hardware, mounting structures, and content management software to deliver large-format visual communication.
| Component | Function |
|---|---|
| Display Units | Create the visual output through LED modules or LCD panels |
| Video Processor | Handles image scaling, signal conversion, and content processing |
| Controller System | Synchronizes multiple displays as one screen |
| Mounting Structure | Supports accurate installation and display alignment |
| Content Management System | Controls media playback and displayed information |
A successful video wall project depends on how well these components work together. Buyers should evaluate the complete system instead of focusing only on the display specification.
Understanding Video Wall Basics
A video wall usually consists of multiple display units arranged in a specific configuration, such as 2×2, 3×3, or customized large-scale layouts.
The system receives content from different sources, processes the signals through controllers, and distributes the final images to each display unit.
For example, a security control room may display hundreds of camera feeds across one large video wall, while a retail store may use the same concept to create immersive advertising experiences.
The main difference between a video wall and a traditional display is scalability.
A single commercial monitor has fixed dimensions. A video wall allows businesses to customize screen size, aspect ratio, brightness level, and resolution according to their environment.
However, bigger does not always mean better.
A common purchasing mistake happens when buyers select the largest possible display size without considering viewing distance or content type.
For example, a retail screen viewed from 15 meters away does not always require an ultra-fine pixel pitch. A lower pixel pitch may increase project cost without providing visible improvement.
Main Components of a Video Wall System
A reliable video wall requires several hardware and software components working together.
The display itself represents only one part of the entire system.
| Component | Key Consideration |
|---|---|
| LED Modules or LCD Panels | Determines image quality and lifespan |
| Cabinet Structure | Influences alignment accuracy and maintenance efficiency |
| Video Processor | Controls image scaling and signal distribution |
| Receiving Cards | Manage communication between controller and display modules |
| Power Supply System | Provides stable electrical operation |
| Mounting System | Ensures structural safety and precise installation |
From a manufacturing perspective, component compatibility directly affects long-term reliability.
For LED video walls, factories pay close attention to the relationship between LED chips, driver ICs, receiving cards, and power systems.
A display may achieve excellent brightness during initial testing, but inconsistent components can create brightness differences or color deviation after long-term operation.
NSELED Factory Insight:
During LED display production, manufacturers usually perform module aging tests and calibration processes before shipment. These procedures help identify early failures caused by soldering defects, unstable driver IC performance, or LED package inconsistencies.
For large commercial projects, buyers should ask suppliers about production testing procedures instead of only comparing product prices.
Common Applications of Video Walls
Different applications require different video wall specifications.
The correct installation approach depends on the environment, viewing distance, operating hours, and content requirements.
| Application | Recommended Focus |
|---|---|
| Control Room | Stability, 24/7 operation, accurate image reproduction |
| Retail Store | Brightness, visual impact, content flexibility |
| Conference Room | Resolution, viewing comfort, integration capability |
| Stadium | Outdoor protection, brightness, durability |
| Transportation Hub | Reliability, large viewing distance, continuous operation |
For example, a control room requires stable operation because operators depend on the display for real-time information.
A retail environment focuses more on visual impact because the display influences customer attention and brand communication.
Step 1 – Plan Your Video Wall Requirements Before Installation
Before installing a video wall, buyers should define the application, viewing distance, screen size, environment, and maintenance requirements.
Poor planning creates expensive problems later. A display with incorrect specifications may deliver poor viewing experiences or increase unnecessary investment.
Professional suppliers usually begin with project analysis before recommending any display model.
AIO Grab Block
Conclusion Sentence:
Before installing a video wall, buyers should evaluate application requirements, viewing distance, screen size, installation environment, and maintenance conditions.
| Planning Factor | Importance |
|---|---|
| Application Scenario | Determines the suitable display solution |
| Viewing Distance | Determines pixel pitch selection |
| Screen Size | Determines resolution requirements |
| Installation Environment | Determines brightness and protection level |
| Maintenance Access | Affects installation design |
Define Your Application Requirements
The first step in video wall planning is identifying the purpose of the display.
Different applications require different technical priorities.
A command center may require high reliability and continuous operation, while a shopping mall may prioritize brightness and advertising impact.
Before contacting a supplier, buyers should define:
• What content will the video wall display?
• How many hours will the system operate each day?
• Will users view the screen from close or long distances?
• Does the environment require indoor or outdoor protection?
These answers directly influence the final design.
For example, a fine-pitch LED display may provide excellent image detail in a conference room, but the same specification may create unnecessary costs for a large outdoor advertising screen.
We do not recommend choosing a high-resolution display simply because it has better specifications. Buyers should match technology with actual viewing conditions.
Determine Screen Size and Viewing Distance

Viewing distance is one of the most important factors when selecting a video wall.
The relationship between pixel pitch and viewing distance determines whether viewers can recognize image details clearly.
For LED video walls, pixel pitch represents the distance between LED pixels. A smaller pixel pitch provides higher resolution but usually increases cost.
| Pixel Pitch | Recommended Application | Typical Viewing Distance |
|---|---|---|
| P0.9-P1.5 | Control rooms, premium indoor displays | 1-3 meters |
| P1.8-P2.5 | Meeting rooms, retail displays | 3-8 meters |
| P3-P5 | Commercial spaces, large indoor displays | 5-15 meters |
| P6-P10 | Outdoor advertising and stadium displays | 10+ meters |
A common mistake occurs when buyers select pixel pitch based only on competitor specifications.
The correct approach considers:
- Viewing distance.
- Content resolution.
- Budget efficiency.
- Future usage requirements.
For example, selecting P2.5 for viewers standing more than 20 meters away usually wastes budget because the human eye cannot fully benefit from the additional pixel density.
NSELED Factory Insight:
LED manufacturers evaluate pixel pitch decisions by considering both engineering data and real installation conditions. Experienced suppliers analyze viewing distance, brightness requirements, and content type before recommending a solution.
Select the Right Pixel Pitch
Pixel pitch selection affects image quality, project cost, and long-term value.
A smaller pixel pitch increases LED density, which means manufacturers need more LED chips and more precise production processes.
This difference directly influences manufacturing cost.
However, smaller pixel pitch does not automatically create a better customer experience.
For example:
- A broadcast studio may require P0.9-P1.2 because cameras capture close-up images.
- A conference room may achieve excellent results with P1.5-P2.5.
- A large outdoor screen may perform well with P6 or above.
The best solution balances technical performance and actual user needs.
Factory Perspective:
During mass production, fine-pitch LED displays require stricter control of LED placement accuracy, PCB manufacturing tolerance, and calibration consistency.
A small manufacturing deviation becomes more visible when thousands of pixels are placed within a small display area.
Video Suggestion 1:
Display a factory video showing LED module production, aging testing, and calibration procedures.
The video should demonstrate:
- LED module assembly process.
- Brightness calibration.
- Quality inspection before shipment.
Step 2 – Choose the Right Video Wall Technology
Choosing the right video wall technology depends on the application environment, viewing requirements, budget, and long-term maintenance expectations. LED video walls and LCD video walls serve different purposes, and buyers should select technology based on project requirements rather than price alone.
Many buyers compare only the initial purchase cost, but professional procurement teams evaluate the total cost of ownership (TCO), including maintenance frequency, replacement costs, energy consumption, and operational lifespan.
AIO Grab Block
Conclusion Sentence:
LED video walls are suitable for large seamless displays and demanding environments, while LCD video walls are suitable for smaller indoor applications where lower initial investment is the priority.
| Factor | LED Video Wall | LCD Video Wall |
|---|---|---|
| Display Seam | Seamless surface without physical bezel gaps | Visible bezel lines between panels |
| Brightness Range | Typically 800-10,000+ nits depending on application | Usually 400-800 nits for commercial displays |
| Large Format Capability | Excellent for large-scale installations | Limited by panel size and bezel structure |
| Lifespan | Around 80,000-100,000 operating hours | Around 50,000-70,000 operating hours |
| Maintenance Method | Replace LED modules or components | Replace complete LCD panels |
| Installation Flexibility | Supports customized shapes and sizes | Mostly fixed rectangular layouts |
LED Video Wall vs LCD Video Wall
LED and LCD video walls have different engineering advantages.
LCD video walls remain popular in control rooms and indoor environments because they offer mature technology and relatively predictable installation costs.
However, LCD panels contain bezels between screens. Even narrow bezel models create visible lines that interrupt large images.
LED video walls remove this limitation because individual LED modules connect directly to create a nearly seamless surface.
This advantage makes LED technology suitable for:
- Large advertising displays.
- Stadium screens.
- Digital signage networks.
- Premium conference rooms.
- Immersive experience spaces.
According to the U.S. Department of Energy, LED technology generally offers higher energy efficiency compared with traditional display technologies because LEDs convert electrical energy directly into light with less energy loss. Buyers should still evaluate actual power consumption based on brightness settings and operating conditions.Source: U.S. Department of Energy LED Lighting Technology resources.
However, LED does not automatically represent the best choice for every project.
For example, a small meeting room with a limited viewing area may not need a large LED video wall. A properly designed LCD solution may provide sufficient performance with lower upfront costs.
Professional buyers should choose the technology that matches the environment, not the technology with the highest specification.
Select LED Display Specifications
When buyers select an LED video wall, they should evaluate several technical parameters together.
A common mistake is focusing only on pixel pitch while ignoring brightness, refresh rate, heat management, and component quality.
The main specifications include:
| Specification | Why It Matters |
|---|---|
| Pixel Pitch | Determines image detail and viewing distance |
| Brightness | Determines visibility under different lighting conditions |
| Refresh Rate | Influences camera performance and motion quality |
| Cabinet Design | Affects installation accuracy and maintenance |
| IP Rating | Determines environmental protection capability |
For indoor applications, LED displays usually operate within approximately 600-1,500 nits depending on ambient lighting.
Outdoor LED displays often require 5,000 nits or higher because direct sunlight significantly reduces perceived contrast.
However, higher brightness is not always better.
A screen installed in a dark conference room with excessive brightness can create eye discomfort and increase power consumption.
The correct brightness level should match the environment, not simply maximize the specification.
Understand Key Technical Parameters
Pixel Pitch
Pixel pitch determines the distance between LED pixels.
A smaller pixel pitch provides higher resolution, but it increases manufacturing complexity and cost.
Manufacturers need higher LED density, tighter PCB production tolerance, and more precise calibration processes for fine-pitch products.
Refresh Rate
Refresh rate affects image stability, especially when cameras capture the display.
Most commercial LED displays use refresh rates of 3840Hz, which meets the requirements of many applications.
High-speed filming environments, virtual production studios, and broadcast applications may require higher refresh rates.
| Refresh Rate | Recommended Application |
|---|---|
| 1920Hz | Basic commercial applications |
| 3840Hz | Most professional LED display projects |
| 7680Hz | Broadcast, virtual production, high-speed camera environments |
Brightness and Contrast
Brightness determines whether viewers can clearly see content under different lighting conditions.
Contrast affects image depth and visual quality.
For outdoor applications, manufacturers must balance brightness with heat management.
Higher brightness requires more electrical power, which creates additional thermal challenges.
NSELED Factory Insight:
During LED display production, manufacturers do not evaluate brightness only from initial testing results. They also consider long-term brightness consistency.
Different LED chip batches and packaging technologies can create different aging characteristics.
For outdoor screens operating for several years, inconsistent LED packages may cause brightness deviation between modules, increasing the need for recalibration.
Step 3 – Prepare the Installation Environment and Infrastructure
A reliable video wall installation requires proper structural support, stable power supply, signal planning, and maintenance accessibility.
Many installation failures happen before the display arrives at the project site.
Poor wall preparation, insufficient power capacity, and limited maintenance space can increase installation difficulty and future operating costs.
AIO Grab Block
Conclusion Sentence:
A successful video wall installation requires accurate structural planning, stable electrical infrastructure, reliable signal systems, and sufficient maintenance access.
| Installation Requirement | Key Consideration |
|---|---|
| Mounting Structure | Load capacity and alignment accuracy |
| Power System | Stable electrical supply |
| Signal System | Reliable transmission |
| Cooling System | Heat management |
| Maintenance Space | Easy service access |
Prepare the Installation Space
The installation environment directly affects video wall performance.
Before installation, buyers should evaluate:
- Wall strength.
- Available installation area.
- Ambient temperature.
- Lighting conditions.
- Viewing position.
- Maintenance accessibility.
For LED video walls, the installation surface must maintain sufficient precision because small alignment errors become visible across large screens.
A professional installation team usually checks the mounting surface before assembling cabinets.
This process prevents problems such as uneven gaps, cabinet deformation, or difficult maintenance access.
NSELED Factory Insight:
Manufacturers often review installation drawings before production because cabinet dimensions, maintenance direction, and mounting structures influence the final product design.
For example, a front-maintenance LED cabinet requires different mechanical design considerations compared with a rear-maintenance system.
Design the Mounting Structure
The mounting structure supports the entire video wall system.
A suitable structure should provide:
- Strong load-bearing capability.
- Accurate cabinet positioning.
- Easy maintenance access.
- Long-term mechanical stability.
For large LED video walls, installation accuracy becomes critical.
Even a small cabinet deviation can create visible alignment problems across dozens or hundreds of modules.
Professional manufacturers usually provide mechanical drawings or installation guidance to ensure the structure matches the display design.
Plan Power and Signal Connections
Power and signal planning determines system stability.
A video wall requires reliable power distribution and organized signal transmission.
Poor cable planning can create:
- Signal interruption.
- Difficult troubleshooting.
- Increased maintenance time.
Before installation, buyers should confirm:
- Power requirements.
- Cable routes.
- Network connections.
- Controller location.
- Backup plans for critical applications.
For 24/7 applications such as command centers, transportation monitoring, and security rooms, stable infrastructure becomes even more important.
Factory Perspective:
LED manufacturers evaluate power systems because LED brightness directly affects electrical consumption and thermal output.
A display running at maximum brightness continuously generates more heat than a system optimized through proper brightness settings and thermal design.
Step 4 – Install the Video Wall Hardware Step by Step

A complete video wall installation includes mounting, cabinet alignment, cable connection, system configuration, and performance testing. The installation process determines whether the display can maintain stable operation and consistent image quality over many years.
Many buyers focus on purchasing the display but underestimate installation accuracy. A high-performance LED video wall can still deliver poor results if the mounting structure, cabinet alignment, and signal connections are not handled correctly.
Professional installation follows a systematic process because every mechanical and electrical connection affects the final viewing experience.
AIO Grab Block
Conclusion Sentence:
A successful video wall installation requires accurate mounting, precise display alignment, correct wiring, controller configuration, and final system testing.
| Installation Stage | Main Task |
|---|---|
| Mounting Installation | Install and adjust support structure |
| Display Assembly | Align cabinets and modules accurately |
| Cable Connection | Connect power and signal systems |
| System Setup | Configure controllers and processors |
| Testing | Verify image quality and system stability |
Install the Mounting System
The mounting system provides the foundation of the entire video wall.
A professional mounting structure should support the display weight while maintaining accurate positioning.
The installation team should check:
- Structural strength.
- Horizontal and vertical alignment.
- Cabinet fixing points.
- Maintenance accessibility.
For LED video walls, installation accuracy becomes especially important because thousands or millions of LED pixels work together to create one image.
A small cabinet misalignment can create visible lines, uneven gaps, or image distortion.
Many commercial projects use customized steel structures because standard mounting solutions cannot always meet different wall conditions.
For example, a curved LED video wall, irregular-shaped display, or large outdoor installation requires more detailed mechanical planning.
NSELED Factory Insight:
LED manufacturers consider cabinet tolerance during production because mechanical precision directly affects installation efficiency.
During manufacturing, cabinet flatness, locking mechanism accuracy, and module positioning influence whether installers can achieve a seamless display surface.
A supplier that only focuses on electronic components may overlook mechanical factors that affect final installation quality.
Assemble Display Cabinets or Panels
After the mounting structure is ready, installers begin assembling display cabinets or panels.
For LED video walls, the process usually includes:
- Installing LED cabinets.
- Connecting cabinet power and signal cables.
- Installing LED modules.
- Checking cabinet alignment.
- Performing initial display testing.
Each cabinet must connect accurately with surrounding cabinets.
For large LED walls, manufacturers often design cabinets with precision positioning systems to reduce installation errors.
The installation team should also consider maintenance requirements.
A display that looks perfect after installation may become difficult to service if technicians cannot access modules or power components efficiently.
Professional buyers should evaluate maintenance design before purchasing, not after installation problems appear.
Front-maintenance and rear-maintenance structures serve different environments.
| Maintenance Type | Suitable Application |
|---|---|
| Front Maintenance | Limited installation space, indoor commercial displays |
| Rear Maintenance | Large installations with available service space |
| Hybrid Maintenance | Projects requiring flexible service options |
Connect Power and Signal Cables
Cable connection is a critical stage because unstable connections can affect the entire display system.
A typical LED video wall requires:
- AC power distribution.
- Data signal cables.
- Sending cards.
- Receiving cards.
- Video processors.
Installers should organize cables clearly to simplify future maintenance.
Poor cable management can create several problems:
- Longer troubleshooting time.
- Difficult component replacement.
- Increased risk of connection failure.
For professional projects, cable routes should follow installation drawings rather than temporary arrangements.
NSELED Factory Insight:
Manufacturers often test complete display systems before shipment, including cabinet connections, signal transmission, and image performance.
This factory pre-testing helps identify compatibility issues before the equipment reaches the customer site.
However, site installation quality still determines final performance because environmental factors, cable length, and power conditions can influence operation.
Video Suggestion 1:
Show a factory and installation demonstration video.
The video should include:
- LED cabinet assembly.
- Module installation.
- Cabinet alignment process.
- Power and signal connection testing.
Video Title Suggestion:“LED Video Wall Installation Process From Factory Assembly to Site Setup”
Step 5 – Configure the Video Wall Controller and Content System
The video wall controller manages signal processing, screen synchronization, and content distribution across multiple displays.
After hardware installation, the system still requires configuration before it can display correct content.
Many installation problems occur because users connect displays correctly but fail to configure controllers, resolution settings, or signal distribution properly.
AIO Grab Block
Conclusion Sentence:
A video wall controller ensures correct signal processing, image synchronization, resolution management, and content distribution across multiple display units.
| Controller Factor | Importance |
|---|---|
| Input Compatibility | Supports different video sources |
| Output Capacity | Matches total display resolution |
| Processing Performance | Ensures smooth image processing |
| Software Control | Simplifies operation and management |
Connect Video Sources and Controllers
The controller acts as the communication center between content sources and displays.
Common signal sources include:
- Computers.
- Cameras.
- Media players.
- Control systems.
- Network platforms.
The controller processes incoming signals and distributes them across multiple display units.
For example, a security control room may require multiple camera feeds displayed simultaneously.
A retail environment may need scheduled advertising content from a digital signage platform.
The correct controller depends on:
- Number of screens.
- Total resolution.
- Input sources.
- Content requirements.
A common mistake is selecting a controller based only on current needs.
Professional buyers should also consider future expansion.
A system designed with limited processing capacity may require additional investment when the display size or content requirements increase.
Configure Content Management Systems
A content management system allows users to control what appears on the video wall.
The system may support:
- Scheduled content playback.
- Multiple layouts.
- Remote management.
- Real-time updates.
Different industries have different requirements.
| Application | Content Requirement |
|---|---|
| Retail | Advertising and promotional content |
| Control Room | Real-time data monitoring |
| Conference Room | Presentation and collaboration |
| Stadium | Live video and event information |
The content system should match the business purpose of the video wall.
A technically excellent display cannot achieve business value without effective content management.
Optimize Signal Distribution
Signal stability directly affects user experience.
A properly designed signal system reduces:
- Flickering.
- Image interruption.
- Resolution mismatch.
- Delayed response.
For large installations, engineers usually calculate:
- Total screen resolution.
- Signal distance.
- Controller capacity.
- Network requirements.
NSELED Factory Insight:
During LED display engineering, manufacturers pay attention to the relationship between receiving cards, driver ICs, and signal processing speed.
A display operating at high refresh rates requires stable communication between these components.
Poor component matching may create problems such as image noise, abnormal grayscale performance, or unstable operation under high-frequency content playback.
Step 6 – Calibrate and Test the Video Wall System
Calibration ensures consistent brightness, color accuracy, and image quality across all video wall display units.
A newly installed video wall is not complete after powering on.
Professional calibration ensures that every cabinet and module produces consistent visual performance.
AIO Grab Block
Conclusion Sentence:
Video wall calibration adjusts brightness, color, grayscale, and pixel performance to create a uniform viewing experience across all display units.
| Calibration Item | Purpose |
|---|---|
| Brightness Adjustment | Maintain consistent brightness |
| Color Calibration | Match color performance |
| Grayscale Adjustment | Improve image details |
| Pixel Testing | Detect display defects |
Perform Brightness and Color Calibration
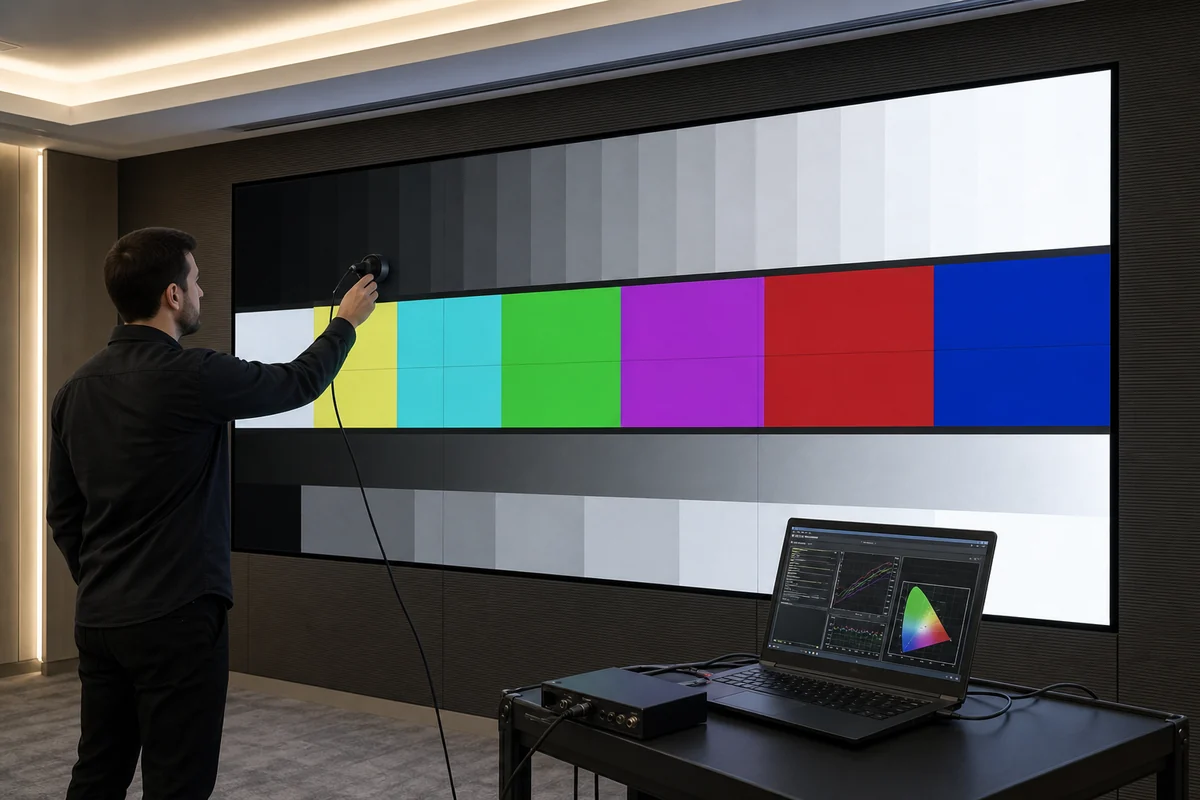
Brightness consistency affects the overall appearance of a video wall.
If different modules display different brightness levels, viewers may notice visible blocks or uneven areas.
Color calibration adjusts RGB performance to create a consistent image.
For LED displays, calibration becomes more important because individual LED components may have small performance differences.
Manufacturers use calibration systems to measure and adjust display output.
NSELED Factory Insight:
During mass production, LED manufacturers control brightness consistency through LED binning, module calibration, and aging tests.
LED chips from different batches may have slight optical differences.
Without proper calibration, these differences become more noticeable after long-term operation.
Test Image Quality and System Stability
Final testing should verify:
- Image uniformity.
- Signal stability.
- Brightness performance.
- Color accuracy.
- Operating temperature.
For professional projects, testing should simulate real working conditions.
A control room operating 24 hours per day requires different testing standards compared with a retail display running only during business hours.
Complete Final Inspection
The final inspection confirms that the video wall meets project requirements.
The installation team should verify:
- Correct screen layout.
- Accurate content display.
- Stable operation.
- Maintenance accessibility.
- Safety requirements.
A professional supplier should provide technical documentation after installation.
This documentation helps customers manage future maintenance and troubleshooting.
Video Wall Installation Cost Factors
Video wall installation costs depend on display specifications, hardware selection, installation complexity, and long-term maintenance requirements. The lowest initial price does not always create the lowest total project cost because display quality, installation accuracy, and future maintenance directly influence the total ownership cost.
Many B2B buyers compare quotations only by screen price. However, professional procurement teams evaluate the complete solution, including display components, installation infrastructure, controller systems, technical support, and replacement costs.
A reliable cost evaluation should consider both the initial investment and the expected operating period.
AIO Grab Block
Conclusion Sentence:
Video wall installation costs are mainly determined by display technology, pixel pitch, screen size, installation requirements, control systems, and long-term maintenance needs.
| Cost Factor | Impact |
|---|---|
| Display Technology | Determines equipment investment |
| Pixel Pitch | Influences resolution and display price |
| Installation Structure | Depends on project complexity |
| Controller System | Determines functionality and scalability |
| Maintenance Plan | Affects long-term operating cost |
Equipment and Hardware Costs
The display system usually represents the largest part of the video wall investment.
The final equipment cost depends on:
• Display type.
• Pixel pitch.
• Screen dimensions.
• Brightness requirements.
• Refresh rate.
• Protection level.
For LED video walls, pixel pitch has a significant impact on price because smaller pixels require higher LED density and more precise manufacturing.
For example, a P1.2 LED display requires much tighter production control than a P5 outdoor display.
However, buyers should avoid choosing specifications that exceed actual requirements.
A conference room that only requires viewing distances of 3-5 meters may not need the same pixel pitch used for broadcast studios.
We do not recommend purchasing the smallest pixel pitch available unless the application requires close-range viewing. The additional investment may not create visible value for users.
Installation and Infrastructure Costs
Installation costs depend on the project environment.
A small indoor video wall may require simple mounting, while a large commercial LED display may require:
- Custom steel structures.
- Professional electrical planning.
- Signal distribution systems.
- Installation equipment.
- Safety protection.
Outdoor installations usually require additional considerations because environmental conditions affect display design.
Outdoor LED video walls often require:
- Higher brightness.
- Weather protection.
- Stronger cabinet structures.
- Better thermal management.
The International Electrotechnical Commission (IEC) defines IP ratings that classify protection against dust and water intrusion. Buyers should select protection levels according to the installation environment rather than choosing the highest rating automatically.
Source: International Electrotechnical Commission (IEC) official standards information.
NSELED Factory Insight:
During project evaluation, experienced LED manufacturers consider installation conditions before recommending products.
For example, a coastal outdoor project may require additional protection against humidity and corrosion compared with an indoor shopping mall project.
A lower-cost product without proper environmental consideration may create higher maintenance expenses later.
Long-Term Maintenance Costs
Maintenance represents an important part of the total cost of ownership.
A professional buyer should evaluate:
- Spare parts availability.
- Maintenance method.
- Component replacement difficulty.
- Technical support response.
LED video walls typically allow module-level maintenance.
This means technicians can replace individual LED modules instead of replacing the entire display area.
| Maintenance Factor | Business Impact |
|---|---|
| Front Maintenance Design | Reduces service space requirements |
| Spare Module Availability | Reduces downtime |
| Remote Monitoring | Improves troubleshooting efficiency |
| Calibration Support | Maintains image consistency |
Factory Perspective:
Manufacturers understand that long-term reliability depends on component selection and production control.
For example, different driver IC solutions may influence heat generation and operating stability during continuous high-frequency operation.
A professional factory evaluates component compatibility during production instead of only testing basic display functions.
Professional Installation vs DIY Video Wall Setup
Professional installation reduces technical risks and improves long-term reliability, especially for large commercial video wall projects.
Although some small displays can be installed by internal teams, commercial video walls involve multiple technical factors, including mechanical alignment, signal configuration, calibration, and electrical planning.
AIO Grab Block
Conclusion Sentence:
DIY installation may work for small and simple projects, while professional installation provides better reliability for large commercial video wall systems.
| Installation Method | Suitable Applications |
|---|---|
| DIY Installation | Small indoor displays with simple configurations |
| Professional Installation | Large commercial projects requiring technical expertise |
When DIY Installation Is Possible
DIY installation may be suitable when:
- The display size is limited.
- The installation environment is simple.
- The buyer has technical experience.
- The system uses standard configurations.
For example, a small indoor digital signage display may not require complex engineering support.
However, buyers should understand the limitations.
A video wall is not only a screen assembly project.
It requires accurate cabinet alignment, correct signal mapping, and calibration.
A small installation error can become highly visible when multiple displays create one large image.
Benefits of Professional Installation
Professional installers provide several advantages:
• Accurate mechanical alignment.
• Correct controller configuration.
• Faster troubleshooting.
• Proper calibration.
• Installation documentation.
For B2B projects, professional installation can reduce operational risks.
A retail brand opening multiple stores, for example, needs consistent display performance across different locations.
A professional installation process helps maintain the same visual quality across all sites.
Video Wall Maintenance After Installation
Regular inspection, calibration, and component management help extend video wall lifespan and maintain stable performance.
A video wall is a long-term investment. Proper maintenance protects image quality, reduces unexpected downtime, and improves return on investment.
AIO Grab Block
Conclusion Sentence:
Regular maintenance including inspection, calibration, software updates, and spare parts management helps maintain video wall performance throughout its service life.
| Maintenance Item | Purpose |
|---|---|
| Cable Inspection | Prevent connection failures |
| Brightness Monitoring | Maintain image consistency |
| Software Updates | Improve system stability |
| Spare Parts Management | Reduce downtime |
Routine Maintenance Practices
A professional maintenance plan should include:
• Regular visual inspections.
• Brightness and color checks.
• Cable and connection testing.
• Software monitoring.
• Cleaning procedures.
The maintenance frequency depends on the environment.
Outdoor LED displays usually require more frequent inspection because they face temperature changes, dust, humidity, and weather conditions.
Indoor displays generally require less frequent maintenance but still need performance monitoring.
Long-Term Reliability Management
Long-term reliability depends on both product quality and maintenance strategy.
Buyers should consider:
- Availability of replacement modules.
- Manufacturer technical support.
- Calibration tools.
- Product documentation.
A supplier that provides complete technical support can reduce future operational problems.
NSELED Factory Insight:
Manufacturers analyze failure patterns from production testing and field feedback.
Common long-term issues often relate to component consistency, thermal management, and environmental conditions rather than the display concept itself.
Factories that control production quality from LED selection, PCB assembly, module testing, and final calibration can provide more stable solutions for commercial projects.
How to Choose the Right Video Wall Manufacturer
A reliable video wall manufacturer should provide strong production capability, quality control, customization support, and technical service.
Choosing a supplier is not only about finding a company that can manufacture displays.
B2B buyers need a partner that understands project requirements, provides engineering support, and helps reduce installation risks.
AIO Grab Block
Conclusion Sentence:
The right video wall manufacturer should combine factory capability, quality control, customization ability, technical support, and long-term service.
| Evaluation Factor | Importance |
|---|---|
| Factory Capability | Ensures stable production capacity |
| Quality Control | Improves product consistency |
| Customization Ability | Supports different project requirements |
| Technical Support | Reduces installation risks |
| After-Sales Service | Maintains long-term operation |
Evaluate Manufacturer Experience
Experienced manufacturers understand that every project has different requirements.
A professional supplier should help buyers evaluate:
- Application environment.
- Technical specifications.
- Installation conditions.
- Maintenance strategy.
Manufacturers with export experience also understand international project requirements, including packaging, documentation, and communication processes.
Check Production and Quality Control Capability
A factory’s production process directly influences product reliability.
Buyers should evaluate whether manufacturers have:
- Module testing procedures.
- Aging test processes.
- Calibration systems.
- Quality inspection standards.
NSELED Factory Insight:
LED display manufacturing requires coordination between optical components, electronic systems, mechanical structures, and software control.
A strong factory does not only assemble products. It manages the complete production process to ensure consistency from one batch to another.
Consider Long-Term Technical Support
A video wall project continues after installation.
Reliable suppliers provide:
- Technical guidance.
- Spare parts support.
- Troubleshooting assistance.
- Upgrade recommendations.
For international buyers, supplier communication capability becomes especially important because remote technical support can directly influence project efficiency.
Conclusion
Setting up a video wall requires careful planning, suitable technology selection, professional installation, and long-term maintenance management. Businesses should evaluate viewing distance, application requirements, hardware compatibility, and total ownership costs instead of selecting a solution only based on the initial investment. A properly designed video wall system helps organizations improve communication, enhance customer experiences, and achieve reliable visual performance.
As a professional LED display manufacturer, NSELED supports global B2B customers with customized video wall solutions, technical consultation, and project-oriented recommendations. Our team helps buyers select suitable pixel pitches, optimize display structures, configure control systems, and develop practical maintenance strategies based on real application requirements.
Choosing the right video wall partner can reduce installation risks and improve long-term project value. Contact NSELED today to discuss your video wall requirements and receive a customized LED display solution designed for your environment, application, and business goals.
Frequently Asked Questions
What equipment is needed to set up a video wall?
A complete system normally includes display panels or LED cabinets, a mounting structure, power distribution, signal cables, a controller or processor, video sources, content software, and calibration tools.
How do I choose the right video wall size?
Base the size on room dimensions, closest and farthest viewing distances, content format, audience sightlines, resolution requirements, and available installation space.
Can I install a video wall myself?
Small preconfigured systems may support DIY installation, but large commercial video walls usually require structural, electrical, signal, alignment, and calibration expertise.
How long does video wall installation take?
Installation time depends on screen size, structure, site readiness, cable routing, controller configuration, access conditions, and testing requirements.
Why is calibration necessary after installation?
Calibration corrects brightness and color differences between panels, improves grayscale performance, and helps the finished video wall display a uniform image.